Using Young
This guide is intended to provide information on how to set up calculations on Young quickly, with the addition of some points specific to CCP-NC. For a more detailed description, please visit the main Young User Guide.
You will need an account to access Young. If you don't have one yet, please read the HPC access page and fill our registration form. Users need to log in to Young via a command line terminal.
Command line terminals
We provide a quick guide on how to connect to Young using a terminal. For more detailed help, see the relevant section in the UCL research computing documentation.
Terminal programs will have already been installed on Linux and Mac systems. On a Mac, search for iTerm in Spotlight, and on most Linux systems Ctrl+Alt+T will open a terminal.
We recommend using WSL (Windows Subsystem for Linux) to access Young from Windows. You can install it by following the instructions on the Microsoft website. Once installed, you can start a terminal by searching for Ubuntu (or whichever linux distribution you selected) in the Start menu and follow the "Logging in" instructions below.
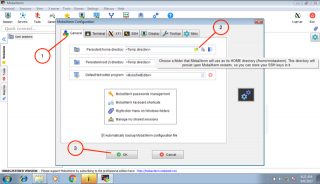
Alternatively, you can use a terminal emulator such as PuTTY or MobaXterm. MobaXterm might be preferable in that it acts both as a terminal and file transfer utility. There is no installation, just download the program. To set it up, click on settings
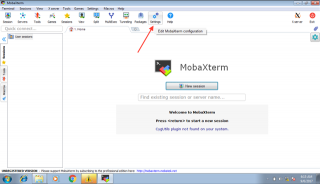
and in the General tab, set a persistent home directory of your choice.
Finally, click on Start local terminal to start the terminal.
After registration, you'll be given a username. To log in, run the following command in the terminal:
ssh <username>@young.rc.ucl.ac.uk
where you need to replace <username> as appropriate.
Open the $HOME/.bash_profile file and append the these lines to the end of the file:
export PATH=/shared/ucl/depts/ccpnc/bin:$PATH
module use /shared/ucl/depts/ccpnc/apps/modulefiles
module load castep/23.1
module load python-ccpnc/3.9-bleeding-edge
At your next log in, you will be able to access the tools CCP-NC provides.
General tip:
If you see any warnings about conflicting module versions, you can clear all the modules by doing:
module purgeand then loading the modules you want. Note, however, that you might then have to load back some default modules manually. For example, you might run:
module load gerun userscripts git tmux emacs screen cmake flex nanowith gerun probably being the most crucial.
The directory /shared/ucl/depts/ccpnc/file_share/ is read-writable for those in the CCP-NC group. To share files with others, you may copy them here. Once you no longer need the files, please delete them.
You can copy files to and from Young using scp or rsync (Linux and Mac) or MobaXterm or WinSCP (Windows). There are two main areas to store data on Young: your home directory ($HOME) and a shared scratch area which is linked to $HOME/Scratch. Here is a summary on what you can and cannot do:
| login nodes | compute nodes | back-up | quota | |
|---|---|---|---|---|
$HOME |
read/write | read-only | yes | 100 GB |
$HOME/Scratch |
read/write | read/write | no | 250 GB |
In short, you must run your jobs in a subdirectory under $HOME/Scratch, but you should copy the results of your job (e.g. the .castep, .magres -out.cell files) under $HOME as soon as the job finished.
Quotas
All users are provided with 100 GB in the backed-up home directory and 250 GB in the scratch directory. You can check your quota usage by running:
lquotaCCP-NC provides a customised version of the castepsub script:
Usage: castepsub <options> castep_seed(s)
Options:
-A <account>              Identifies  the  account  to  which  the resource consumption of the job should be charged. Default: UKCP_NC
-a <jobID[,jobID2,...]>   Defines a dependency. Current job will only be executed after the jobids listed finished
-d                        Debug mode, prints the jobscript but does not submit it
-n <number>               Number of MPI processes. Default: 24
-m <memory>               Amount of memory per process requested in megabytes. Default: 5460
-W <walltime>             Walltime requested in HH:MM:SS format. Default: 01:00:00
-c <castep executable>    Use a different CASTEP executable. Default: castep.mpi (i.e. the one loaded by the module)
-p <paid|free>            Whether to submit a paid job or a low-priority (free) job. Default: paid
-s <scriptname>           Saves job script in <scriptname>
-l <loop|array>           When running multiple seeds, they can be a single job, executed in a loop or sent as an array job. Default: loop
Example:
castepsub -W 2:00:00 -n 40 Si2
will submit a 2 hour, 40 core job to the queue.
Using multiples of 40 cores is strongly recommended, as the nodes on Young have 40 cores each.
castepsub lets you submit multiple jobs at the same time by specifying more than one seed. There are two ways to use this tool. Assume you have seed_one.cell, seed_one.param, seed_two.cell, seed_two.param
in your working directory:
castepsub -l loop seed_one seed_twowill submit a single job to the queue, which will first calculateseed_one, thenseed_two. This approach is most useful when you have multiple small jobs, so they don't have to sit in the queue and wait for being run one-by-one. Just make sure you ask for enough walltime.castepsub -l array seed_one seed_twowill submit, in this case, two separate jobs which form a job array. The members of the job array will run separately as resources on the cluster allow. Your jobs will share a job id, but each of them will also have an array index. You can delete the entire array or just a single member of it.
You can list your seeds in a number of different ways:
seed_one seed_two seed_threeis equivalent toseed_{one,two,three}seed_1 seed_2 seed_3, is equivalent toseed_{1..3}- or it is possible to pad the numbers with zeros, no need to start from 1:
seed_{08..10}is equivalent toseed_08,seed_09andseed_10
If you need to customise the job script, you can use the -s option of castepsub to save the script to a file. You can then edit the script and submit it using qsub <scriptname>.
You can find more information and example scripts for different types of jobs here: https://www.rc.ucl.ac.uk/docs/Example_Jobscripts/
- the
qstatcommand prints basic information about your current jobs
To delete a job, check its job id using qstat, then run qdel <job id> - where <job id> may be a single number or even a list.